Eyebrows - the bane of the makeup world's existence. They can be gorgeous frames for your eyes but they can get pretty bad pretty quickly. I've picked up a couple tips along the way that may prove helpful if you are want to fill in your brows. This will be a step-by-step guide that will hopefully be beneficial to both beginners and those that have been at it for years.

BAD GOOD
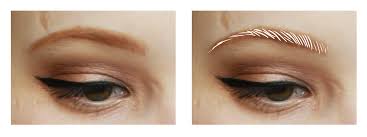
First things first - do not shave off or over-pluck your eyebrows. If you want to know how to shape them then do this pretty simple trick. Take a washable marker or a white/ light coloured eyeliner and mark the following places:
A- The beginning of your eyebrows. This is where your eyebrows should start. Imagine a straight vertical line from the point where your tear duct (inner eye) begins. Any hair before that point can be plucked or removed. Please do not fill this in with any brow filler as this will make your features look lopsided and unibrow-ish.
B - The arch of your eyebrows. Some persons do not have a natural arch - don't force one if one isn't there this can be corrected with brow filler. To locate where your arch will look most natural, look straight ahead. Using a pencil or a ruler and line it up vertically against the side of your nose. Tilt the pencil to the side so it cuts across your pupil in a diagonal line.Where the pencil points is the section of your brow where your arch should be. Mark that with a dot at the top and bottom of your brow.
C- The end of your eyebrows. Over-extended eyebrows can make your eyes look droopy and closed off so you want to make sure that you get this right. Stick that pencil against the side of your nose again and tilt it diagonally so that it is in line with the end of your eye. Put a small dot there. See below:

BAD GOOD
First things first - do not shave off or over-pluck your eyebrows. If you want to know how to shape them then do this pretty simple trick. Take a washable marker or a white/ light coloured eyeliner and mark the following places:
A- The beginning of your eyebrows. This is where your eyebrows should start. Imagine a straight vertical line from the point where your tear duct (inner eye) begins. Any hair before that point can be plucked or removed. Please do not fill this in with any brow filler as this will make your features look lopsided and unibrow-ish.
B - The arch of your eyebrows. Some persons do not have a natural arch - don't force one if one isn't there this can be corrected with brow filler. To locate where your arch will look most natural, look straight ahead. Using a pencil or a ruler and line it up vertically against the side of your nose. Tilt the pencil to the side so it cuts across your pupil in a diagonal line.Where the pencil points is the section of your brow where your arch should be. Mark that with a dot at the top and bottom of your brow.
C- The end of your eyebrows. Over-extended eyebrows can make your eyes look droopy and closed off so you want to make sure that you get this right. Stick that pencil against the side of your nose again and tilt it diagonally so that it is in line with the end of your eye. Put a small dot there. See below:
Once you have those three places marked out then clean up and get rid of any stray hairs. Then brush your hairs downwards to trim any extra long hairs. Brush your hairs back up then onto the filling in!
Filling in Your Brows
Really examine your brows. Do you have any scars or hairs missing or sparse areas? Those are the areas you want to fill in the most. Think of your brow as a gradient. The lightest hand should be towards the beginning of your brow and a heavier hand towards the end of your brow. If you do it that way, then you keep the natural shading and look less harsh.
Choosing your Brow Filler
Natural - for a more natural look, use brow powder
Glam- for a more glamorous look then you can use pencil or a brow pen
Heavy - for a heavier look then you can pair brow powder with pencil
Choosing your Colour
Black hair - dark brown filler the colour of coffee beans or dark chocolate
Brown Hair - ash grey/ dark taupe or chestnut with a flat tone
Red Hair - same as above or a cherry wood colour
Blonde hair - light brown or light taupe.
(If you have highlighted hair then go for the colour of the darker tones in your hair)
Method
The main tip to remember is that you are filling in hair rather than colouring in a blank space in your colouring book.
1. Use short hair-like strokes in the same direction that your hair grows. If you are just starting out or you are trying out a new product then it's best you start at the end of your brows and work your way in. This way, you will deposit more of the colour on the end, making it darker, and less of the colour at the beginning creating the desired gradient effect.
2. Take care of scars or sparseness by going over the area with any remaining product. To specifically thicken up sparse areas, then take an invisible powder and dust over the area then apply more product.
3. Step back and look at your face then head on over to the other brow. A good way to make sure the brows are not too heavy for your look is to finish applying your makeup and then get back to the brows.
4. Brush through each brow with a spooly- brush and keep them in place by applying clear mascara or clear brow wax to them.
Extras
Create a sharper look by outlining your entire brow with your concealer and blending out. Then use highlighter under your arch to define the look even more.
Try it out and let me know what you think. Have a friend that's a little too eager with her brows? Send her the link to this article and one by one we'll save the brows of this earth.
Till next time,
*Jane


0 comments:
Post a Comment
Comments and Questions welcome here! No Foul Language please!